Guest blogger | WHISK: Taste the Love

Good Friday to all you beautiful Apron Ladies and Gentlemen! I have been scouting around for an excellent food/recipe blogger to guest feature on Miss Apron Lady, so that you may all enjoy another passionate culinary artist’s outlook and insight. This is Terri Johnson’s post from her blog http://www.whisktastethelove.wordpress.com . Terri’s blog is a delightful baking and personal blog dedicated to her mom, and every post is very heartfelt. It’s an absolutely exceptional blog, so feel free to check it out when you’re seeking more baking inspiration! Hope you all enjoy it 🙂
Have a foodlicious weekend Apron Ladies and Gentlemen,

Hanna

x

HAPPY BEE-DAY!

Image

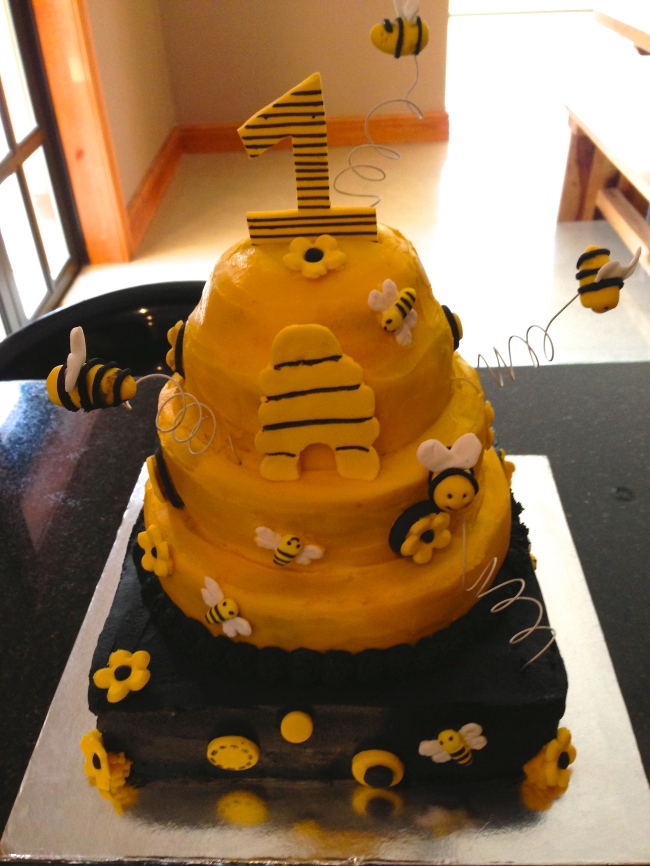
My mom is often asked to make birthday cakes and last month was no exception. She was approached to bake a bee themed birthday cake for a one-year-old girl. She had free reign to bake whatever she thought was best within a reasonable price range and the only passing comment regarding the cake was the word “hive”.

Inspiration was drawn from looking at images on the internet and then she drew up a sketch of what she thought the cake should look like. Like Benjamin Franklin said; “If you fail to plan, you are planning to fail!”. Regardless of this fact, I still find planning pretty boring, and now you still need to do it in baking!

The first order of business was making the little bumblebees, flowers, miniature hives and the #1. These were all made from edible plastic icing. These can be made ahead of time as it doesn’t go stale or “off”. Plastic icing can be bought at most baking supply stores or if you’re feeling adventurous, you can make your own BUT life is far too short to be bogged down trying to make your own plastic icing. She said that modeling the little wings for the bees was the most frustrating process. Another mission was the crumb coating. “Crumb coating”?! I did not know what crumb coating was until right then. It’s the base layer of icing applied to a cake. It makes for easier and smoother finishing of your final layer of icing. She chose to use butter icing opposed to fondant because it simply tastes better!

The red velvet cake had four tiers; one square base with 3 round top layers that formed the hive. Red velvet is my favourite, so luckily for me I got to eat the off cuts of the cake. To keep the layers of cake from sagging one into the other, you should ideally put dowels (supportive rods) in the base layers to support additional weight BUT she is not a professional and just decided to use straws hahaha. It did the trick!

All her time and effort spent making the cake was rewarded when the birthday girl squealed with excitement when she saw her bee-cake :)

– Terri Johnson, http://www.whisktastethelove.wordpress.com
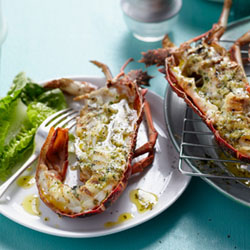
Recipe: Braaied crayfish with roasted garlic and parsley butter

Amazing 🙂

The Cheshire Cat

Enough to get your mouth watering at any time of day. Happy Thursday!

(From Food24.com)

Braaied crayfish with roasted garlic and parsley butter

Preparation time:  15 min                                Cooking time: 10 min

 d83adbae176e4e708a4eabd9adc1ea89Luxurious crayfish, simple and satisfying. King prawns work just as well.
Ingredients:
  •  4 Crayfish/King Prawns
  •  Garlic & Parsley Butter
  •  1 head granulated garlic – roasted
  •  125 g butter
  • 1 grated lemon peel & juice
  • 80 ml chopped parsley
  • pinch of salt and ground pepper
  • 4 lemon wedges for serving

Method

Halve crayfish lengthways and remove vein.
Rinse and pat dry with kitchen paper.
Garlic & parsley butter:
Squeeze flesh out of roasted garlic. Place garlic, butter, lemon peel and juice and parsley into a blender, season and blitz until smooth.
Spread a generous dollop of butter over the cut side of each crayfish.
Cook crayfish, cut-side up, over medium-hot coals for 5 minutes.
Turn and cook for 3-5 minutes…

View original post 43 more words

Recipe: Lasagna

Image

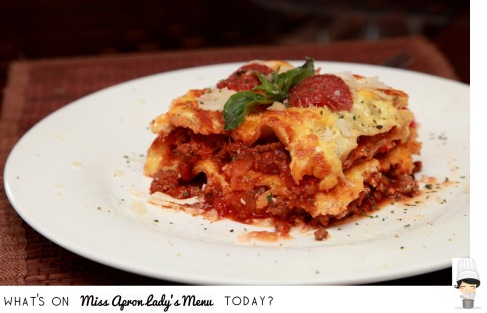
Homemade lasagna! With cottage, mozzarella, Cheddar cheese, finished in 3 tomato sauces topped with salami.

Ingredients:

.    454 grams sweet Italian sausage

.    340 grams lean ground beef

.    1/2 cup minced onion

.    2 cloves garlic, crushed

.    1 (794 grams) can crushed tomatoes

.    2 (170 grams) cans tomato paste

.    2 (184 grams) cans canned tomato sauce

.    1/2 cup water

.    2 tablespoons white sugar

.    1 1/2 teaspoons dried basil leaves

.    1/2 teaspoon fennel seeds

.    1 teaspoon Italian seasoning

.    1 tablespoon salt

.    1/4 teaspoon ground black pepper

.    4 tablespoons chopped fresh parsley

.    12 lasagna noodles

.    454 grams ricotta cheese

.    1 egg

.    1/2 teaspoon salt

.    340 grams pound mozzarella cheese, sliced

.    3/4 cup grated Parmesan cheese

Directions:

  1. In a Dutch oven, cook sausage, ground beef, onion, and garlic over medium heat until well browned. Stir in crushed tomatoes, tomato paste, tomato sauce, and water. Season with sugar, basil, fennel seeds, Italian seasoning, 1 tablespoon salt, pepper, and 2 tablespoons parsley. Simmer, covered, for about 1 1/2 hours, stirring occasionally.
  2. Bring a large pot of lightly salted water to a boil. Cook lasagna noodles in boiling water for 8 to 10 minutes. Drain noodles, and rinse with cold water. In a mixing bowl, combine ricotta cheese with egg, remaining parsley, and 1/2 teaspoon salt.
  3. Preheat oven to 375 degrees F (190 degrees C).
  4. To assemble, spread 1 1/2 cups of meat sauce in the bottom of a 9×13 inch baking dish. Arrange 6 noodles lengthwise over meat sauce. Spread with one half of the ricotta cheese mixture. Top with a third of mozzarella cheese slices. Spoon 1 1/2 cups meat sauce over mozzarella, and sprinkle with 1/4 cup Parmesan cheese. Repeat layers, and top with remaining mozzarella and Parmesan cheese. Cover with foil: to prevent sticking, either spray foil with cooking spray, or make sure the foil does not touch the cheese.
  5. Bake in preheated oven for 25 minutes. Remove foil, and bake an additional 25 minutes. Cool for 15 minutes before serving.

COMPETITION GIVE AWAY: 100 LINDT MILK TRUFFLES

Image

As my blogging journey nears its end, I cannot express the overwhelming gratitude for my readers’ appreciation of my blog posts enough. Thanks to all of the wonderful comments of encouragement, my anxiety when I started my first blog was quickly replaced with excitement. I would like to give a small token of love to my readers, without whom I would not have been able to further improve my blog. Some divine premium Lindt Swiss chocolate for the learning curve of an experience you have all rewarded me with!

This is a competition/give-away, with the prize being 100 Lindt milk truffles. I am aware of my American, Australian, Taiwanese, and Philippine readers. If you win, they will be air mailed to you. The competition only runs for 5 days, and it’s very simple. You have to be an email follower of my blog to enter. Once you’ve followed my blog (if you haven’t already), then comment on this post with both your email address and your favourite Miss Apron Lady recipe I have shared so far! There are 25 to choose from, and they can be easily accessed through my Recipes tab above. State your favourite recipe along with your reason for it being your favourite. Thereafter, tweet me @missapronlady with your favourite recipe and why. I will be choosing my favourite answer, as I don’t believe in random draws, because I feel that the best person should win.

All the best Apron Ladies and Gentlemen! All my love for the remainder of the week.

Hanna

x x x

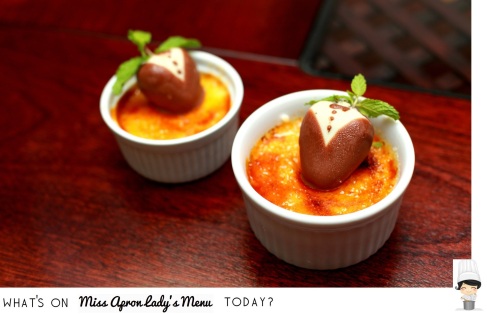
Recipe: Crème brûlée with strawberries as waiters in suits

Image

Crème brûlée with waiters in suits!

Ingredients:

  • 1 litre heavy cream
  • 1 vanilla bean, split and scraped
  • 1 cup vanilla sugar, divided
  • 6 large egg yolks
  • 2 litres hot water
  • strawberries, melted dark and white chocolate (optional)

Directions:

1. Preheat the oven to 325 degrees F.

2. Place the cream, vanilla bean and its pulp into a medium saucepan set over medium-high heat and bring to a boil.

3. Remove from the heat, cover and allow to sit for 15 minutes.

4. Remove the vanilla bean and reserve for another use.

5. In a medium bowl, whisk together 1/2 cup sugar and the egg yolks until well blended and it just starts to lighten in color. Add the cream a little at a time, stirring continually.

6. Pour the liquid into 6 (200 – 230 grams) ramekins. Place the ramekins into a large cake pan or roasting pan.

7. Pour enough hot water into the pan to come halfway up the sides of the ramekins. Bake just until the crème brulee is set, but still trembling in the center, approximately 40 to 45 minutes.

8. Remove the ramekins from the roasting pan and refrigerate for at least 2 hours and up to 3 days.

9. Remove the crème brulee from the refrigerator for at least 30 minutes prior to browning the sugar on top. Divide the remaining 1/2 cup vanilla sugar equally among the 6 dishes and spread evenly on top. Using a torch, melt the sugar and form a crispy top. Allow the crème brulee to sit for at least 5 minutes before serving.

10. Dip strawberries in dark chocolate, then decorate with white chocolate using fingers and tooth picks. Place in refrigerator to set before placing on top of crème brulee.